Chunky Graphics for the ZX81: A New Way to See the Mandelbrot Set
Add grayscale to your ZX81 programs with just a few lines of code.
After completing my Chunk Graphics mode, my thoughts went to how best to use it. My first idea was something new, such as a flight simulator. After pondering, I stuck with something current by modifying my Mandelbrot Set program. With three gradients, it would be an interesting use of the mode.
# Making some adjustments.
Since I had used a similar plotting routine, the conversion was straight forward. My first step was to insert the new chunky plot routine into my assembly code. Because of the 2:1 ratio, I needed to adjust the display loop by 2. That was the easiest part.
pop bc
dec b
dec b           ; skip ahead 2 due to width of pixels (2:1 ratio)
jp nz,x_loop
# Adjusting how I plot points.
Now to actually plot the graphic, I needed to make two adjustments. The first was to set the pen color. That is in the plot_point subroutine. In the original version, it set the pen color 1. Since I now had two clots, I did a little math using the max iterations (maxim) and the current value of i loop. The pen color is then set to either high (2 or black) or low (1 or gray). Here is the routine:
plot_point:             ; yes, plot a point!
        ld a,maxit
        sra a           ; divide by 2
        cp b            ; is i > i/2?
        jr c,set_pen_high
        set_pen_low:
                ld a,1          ; set to gray
                jr set_pen_color
        set_pen_high:
                ld a,2          ; set to black
        set_pen_color:
                ld (pen_color),a
                jr print_pixel  ; and and print it
                set_pen_high:
                ld a,2          ; set to black
        set_pen_color:
                ld (pen_color),a
                jr print_pixel  ; and and print it
Although a bit longer written out, it isn’t a lot of code. The next change was in the print_pixle routine. Since copilot uses half the x axis, I needed to divide x by two to get the correct location. Note that I have to do this twice: once for the top, and once for the mirrored bottom.
print_pixel:
        pop bc          ; pop x,y coordinates
        push bc         ; push them back for later
        sra b           ; divide by 2 for position on screen
        dec b           ; sub x by 1
        ld a,zeroy      ; zeroy-y to (reverses plot)
        sub c
        ld c,a
        call cplot
        pop bc          ; pop x,y coordinates
        push bc         ; push them back for later
        sra b           ; divide by 2 for position on screen
        dec b           ; sub x by 1
        ld a,zeroy-2
        add a,c
        ld c,a
        call cplot
I had one final change which was the progress marker. Like before, I needed to adjust the x access and set the pen color. This was an easy change in two locations: to add it I start the routine, and clear it when done with that line. Here is the starting code for reference:
; display progress indicator
sra b           ; divide by 2 for position on screen
dec b
ld c,zeroy*2-1
ld a,2          ; pen is black
ld (pen_color),a
call cplot
# Some pretty pictures.
With that complete, I now had a functioning Mandelbrot Set using chunky graphics. The images may not be quite as detailed, but I like the added gray scale. The transitions are more interesting now that they aren’t all black. Let’s start with the top level image.
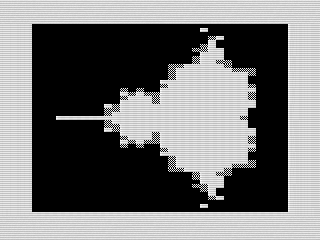 Mandelbrot Set with Chunky Graphics, ZX81 Screenshot, 2022 by Steven Reid
Like before, the program progressively zooms into the fractal. Since the pixel density is cut by half, the animation time is twice as fast.
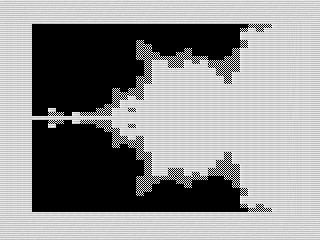 Mandelbrot Set with Chunky Graphics, Zoomed In, ZX81 Screenshot, 2022 by Steven Reid
As it zooms in further, you get a better feel for how the coloring is applied. I really like the field effect around the fractal in this further zoomed in display.
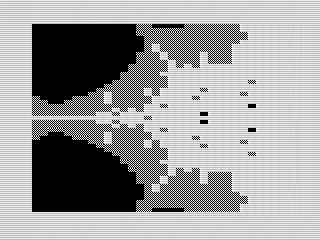 Mandelbrot Set with Chunky Graphics, Zoomed Again, ZX81 Screenshot, 2022 by Steven Reid
# All done for now.
I’m surprised how simple it was to incorporate a gray scaled version of the program. Although losing some fidelity, the added effect is quite pleasing. I have one more iteration of the Mandelbrot Sets program I’ll talk about next month. For now, enjoy the chunky graphics version.