More Mandelbrot Set Fun in Z80 Assembly
My attempt at building a Mandelbrot sets program for the ZX81 in Assembly.
Okay, after finishing my BASIC program version of Mandelbrot Sets, I decided I needed more speed. I wasn’t sure if I could write a version in assembly. My concern was the floating point math. After a good amount of research, and trial and error, I finally got a version working. This is my story.
# Starting with the end.
For those in the audience that just want to see the results, I’ll start with that. Perhaps not quite the TL;DR version, I can share what I came up with and you can decide if you want to read more about how I got here.
I started with the BASIC version of the program as a guide, including using the same scaling and shift factors. The final version has been adjusted a bit to look more interesting. That means that the maximum iterations are a bit more (15 instead of 10), and the scale has been adjusted appropriately. As such, the images generated are different.
Personally, I think the images look better in this version. Given the improved speed, I could play through the scaling loop and see what, and what didn’t, work. The ZX81 still isn’t a powerhouse for speed, but you can now watch it in real time. In fact, I had this running in various forms over a week on my Mac.
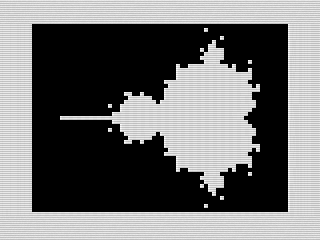 Mandelbrot Sets Machine Code, ZX81 Screenshot, 2022 by Steven Reid
# Stepping back into the code.
Once my mind was made up to give the Assembly code a try, I started with just a template. Since I knew I was plotting points, I used my drawing program as the template. As such, it had most of the routines in it already. As stated previously, I wrote out the BASIC from my earlier version to act as the pseudocode for my machine code program. You can still see it in the comments.
With that in place, I started to convert all the loops and added in a plot routine. I made sure it compiled and ran. The screen filled with pixels, which was a great start. It also gave me a feel for the speed of the routine. It wasn’t overly fast as you could watch it fill pixels from right to left. Yet, it game me a baseline for how fast the floating point routines would be.
Now my first thought was to just use integer math to build my Mandelbrot set. I was going to use 16 bit math, scaled up a bit, to display the points. But as I started to do that I quickly realized that it wouldn’t work the way I expected. I’m pretty sure I could do some of it for the initial image, but the numbers wouldn’t fit in the format I was intending.
# Working out the math.
Realizing that my ideas for how to do the math just wouldn’t work, I started to look around for a z80 floating point library to use. I found a few, but most sites kept sending me back to the same place: Zeda’s z80 floating point math routines. That site had a number of different formats.
I didn’t think I needed 32 bit floating point. Plus that felt too large and probably too slow for my needs. I felt 16 bits would be good enough, but the libraries I was looking at had a lot of includes. Too complex to convert for the assemblers I was using.
In the end, I landed on a 24 bit floating point routine. It used 3 bytes and the math used six registers to make it easier to manage. Having decided on a library and format, I started to code up my program to see how far I’d get. And then I ran into a wall.
My biggest challenge was I wasn’t really sure how the numbers were encoded. I knew they were some derivative of the [ir;=https://en.wikipedia.org/wiki/IEEE_754]IEEE 754 standard[/url], but I didn’t quite understand how that worked. The documents I was using helped a bit, but not quite enough. I needed to figure this stuff out.
Back to the Internet. After an hour of futility, and even looking for other libraries, I finally landed on a Wikipedia article on the single precision floating point format that helped it all click. The article explained the floating point encoding and even had a little section that showed how to do the encoding by hand.
Funny enough, the section was marked for revision as being potentially original material. However, it was just what I needed. I could easily follow the patterns and the routine just clicked. With my new found knowledge, I actually did some digging and found a site that would convert numbers for me. I could now begin to really get my program to work.
# Putting it together.
With my new found ability to generate the numbers, I was off. I started small, just putting a few numbers in. I used the number converter, although it was didn’t have a 24 bit version. That didn’t stop me as I figured out how to convert the 32 bit numbers it generated to the ones I needed.
With the code for the numbers ready, I now needed a routine. The first one was division. I copied in the code, and it didn’t compile. Digging in, I found a few spots where it used some loop label ($_: and $_+) shortcuts. My compiler didn’t support that so I explicitly defined them. Once done, To my surprise, it complied.
With that small success, I kept going with the rest code. As I worked on each routine, I would import the math library that I needed. Multiplication, addition and subtraction were all needed. And then the last function, was the comparison routine. I kind of needed that to be able to know when I needed to plot a pixel.
Now, once I had everything all programmed up, I tested and, to my surprise, it didn’t work. Okay, I wasn’t really surprised. I knew I started to go over the code and finding little things wrong, I finally got it to plot something, but the image wasn’t quite right. Time to do some serious debugging.
# Memory peeking.
For this next stage of debugging, I moved the variables up in my program and pulled up the memory map in my emulator. Normally, I haven’t bothered to go this deep into the operation of my programs. But for this one, I needed to understand if the numbers were actually working as expected.
I also got my python interpreter working on my computer (I had to reinstall Xcode). This let me use the conversion program that came with the floating point library. It outputted the information in hexadecimal and made it a bit easier to match in the memory map. With my workflow in place, I started to run the program.
Now, I focused at each level of the program. I could easily do the math myself. I had already tested a number of routines so I knew that the math worked. Since it wasn’t actually displaying anything correctly though, I walked each of the routines to make sure things were working.
And then I started to find things. I was setting the wrong registers in a couple of places. With that fixed, points started to plot. I then found some routines out of place, a check that was wrong, and a few other issues in my code. It was tedious, but I really enjoyed it when an image started to show.
# Cleaning up and playing.
With the program working, I could start to adjust things. I walked through all the frames making sure things worked as expected. This was when I started to clean up the code as well. I found myself adjusting things like how the plot routines worked. Mostly, it was little things.
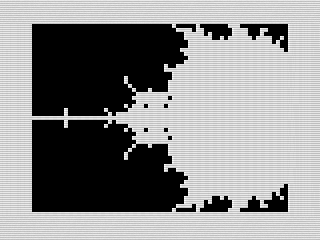 Mandelbrot Sets Machine Code, ZX81 Zooming In Screenshot, 2022 by Steven Reid
Yet, there was something that I kept bugging me. Since I was in assembler, I thought I could use the full screen instead of just the normal area that the ZX81 allowed. So, I started to adjust the loops a bit. This caused all sorts of issues.
For one, the display just stopped working. Apparently I had adjusted something wrong. I was trying to use the full width of the display as the last (or first) column wasn’t getting used. It took me quite a bit of time to figure out my mistake. It ended up being my own misunderstanding of a flag not getting set as expedited. But my mind thought it should. Fixed.
# Adding some quality of life functions.
While testing, I I think found that the mirror code didn’t quite line up. I needed to use an odd number of lines to get things to work right. This meant leaving the bottom row blank. Not wanting to ignore that line completely, I decided to do something with it.
That something was to fix another annoyance of mine. Because the routine just plots over the pervious frame, it isn’t always obvious where it is at in the routine. To help guide the user on what the program is doing, I ended up adding a little plot routine for the current line it was drawing. This created a progress indicator.
 Mandelbrot Sets Machine Code, ZX81 Building Screenshot, 2022 by Steven Reid
I wish I’d added that earlier as it really helped with debugging and testing of new functions. In fact, it inspired some ideas that I hope to get to in a future version of the program. At any rate, it allowed me to do something with that row.
Another thing I did was add a break routine. Since I could just reload the program while I was debugging, I didn’t usually think hard about stopping progress. But that didn’t work as well when I wanted to stop and restart the program.
This sent me down another rabbit hole. I could probably write a whole blog just on that. Suffice to say, it involved digging into the ZX81’s ROM routines. In the end, I had a great way to break out of my program that didn’t require waiting or delay. It was kind of a nice little routine I could use in other programs.
# Wrapping up this version.
With the program complete, I was quite happy to see a version that not only worked faster but was fun to watch. It spawned a lot of ideas that I’ll be exploring in future articles. But for now, I’ll end with this faster version of Mandelbrot Sets for the ZX81.