How to Add Stickers to Complete My Renders
Here is how I updated my render of LEGO set 373 by tracing and adding stickers in Blender.
Taking some time to unwind before my workout, I traced out the last few stickers needed to finish this set. Although I had the images from previous POV-Renders, they weren’t of a high enough quality. I’m not done with this set yet. But, it is close to what is sitting in my storage cases.
![[Image]](https://farm5.staticflickr.com/4719/39358748264_b73467d164_h.jpg) Updated 373 with Stickers by Steven Reid, on Flickr
Updated 373 with Stickers by Steven Reid, on Flickr
A little background.
Offshore Rig is a set I’ve come back to many times over the years. Considering it was one of my first to render, coupled with one of the first to own, it has a special place in my heart. For that reason , Now, the cynic might bemoan that it promotes the destruction of our planet. I for one, enjoy the playability and look of the set.
Although it may not seem like much has changed, it is a bit of a process to add the stickers. Yet, it isn’t hard, and I’m sure there are ways to lean and automate it. Let me walk you through the steps I took to get here.
Sticker hunting we will go.
The first thing I needed was to find an image of the stickers. I’d long lost my original stickers years ago. Given this set is from 1977—yes, when Star Wars was first released—it shouldn’t come as a huge surprise. Off to the Internet I went, scouring for images.
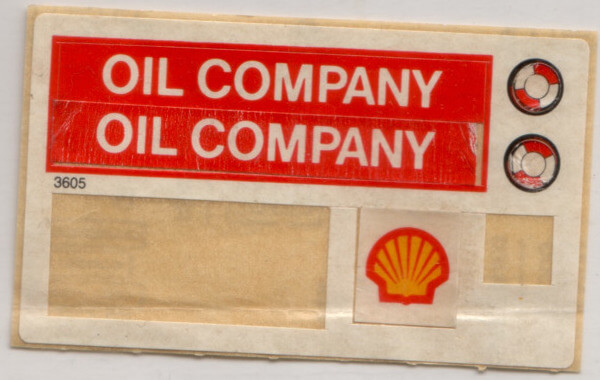 Lego sticker sheet for set 373 Offshore Rig courtesy of Brick Owl
Searching for old stickers can be a bit of pain. They exist, but you might need to try different search terms to narrow down the list. I found the above image of the original sticker sheet, but it was missing some of the stickers. I also stumbled on the reproduction below, but the shell logo isn’t true to the original. Luck was on my side, though, and I could work around both issues.
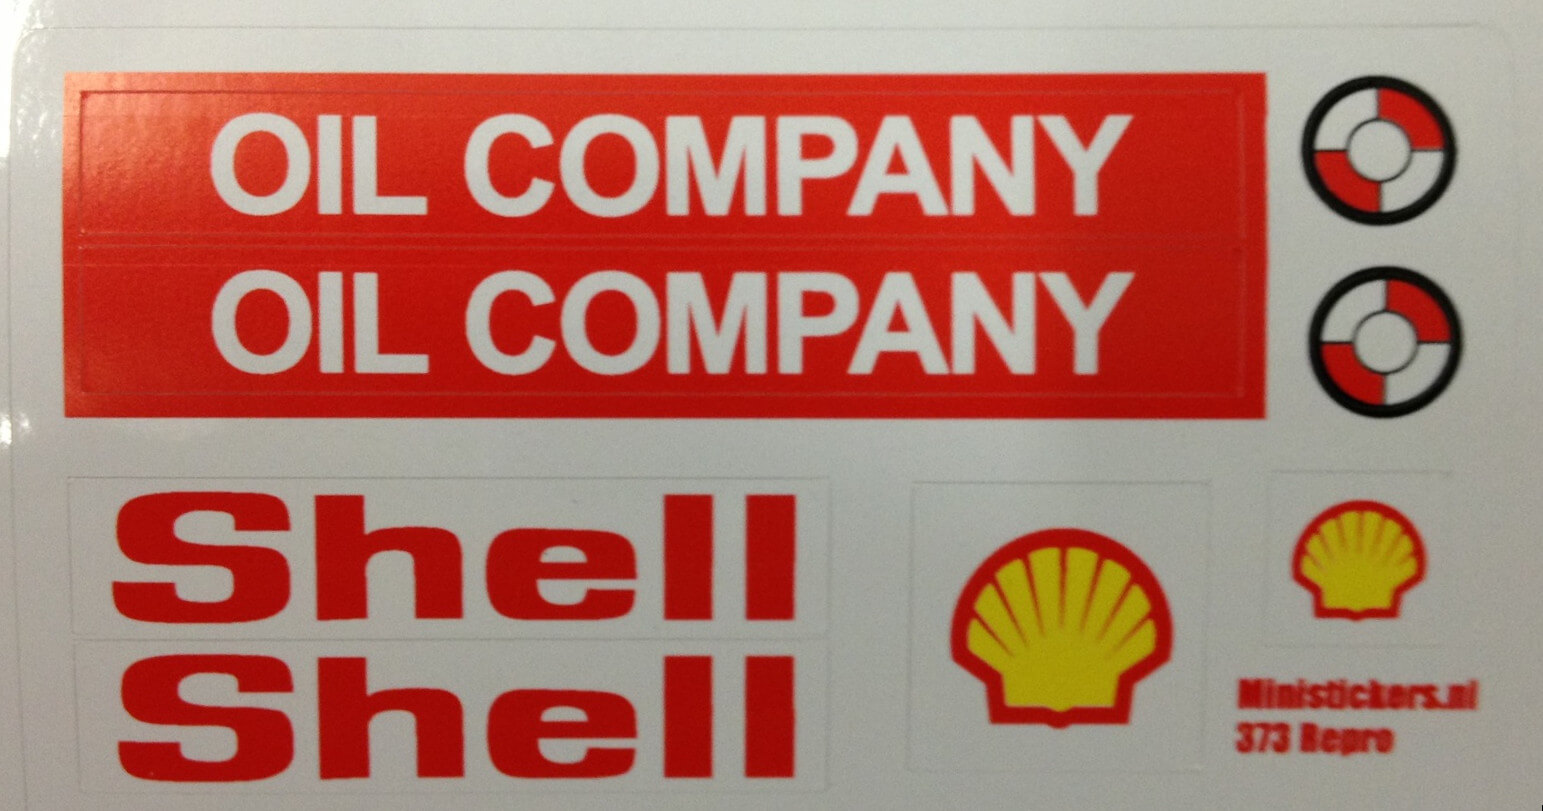 Lego sticker sheet reproduction for set 373 Offshore Rig, corrected
You might notice the corrected note. You need to have a nice flat sticker sheet to trace, which isn’t always the case. I used DxO Perspective to square up the image first and correct any aspect issues. Once square, you can adjust any squash/stretch/tilt issues in your image editor.
Tracing isn’t only for kids.
Once I had the sheets, it was time to trace the stickers I needed. I use Boxy SVG myself as it integrates nicely with my Mac. I tried Inkscape, but couldn’t get over the hoops needed to get it to run. As long as your favorite has layers, you should be fine.
Before starting, check out the parts and decoration resources on Mecabricks. There are links to workflow, color charts, and other tips needed depending on what you are doing. I recommend you add your decoration to the drop box as well. If it is good enough, they will add it into Mecabricks for others to use.
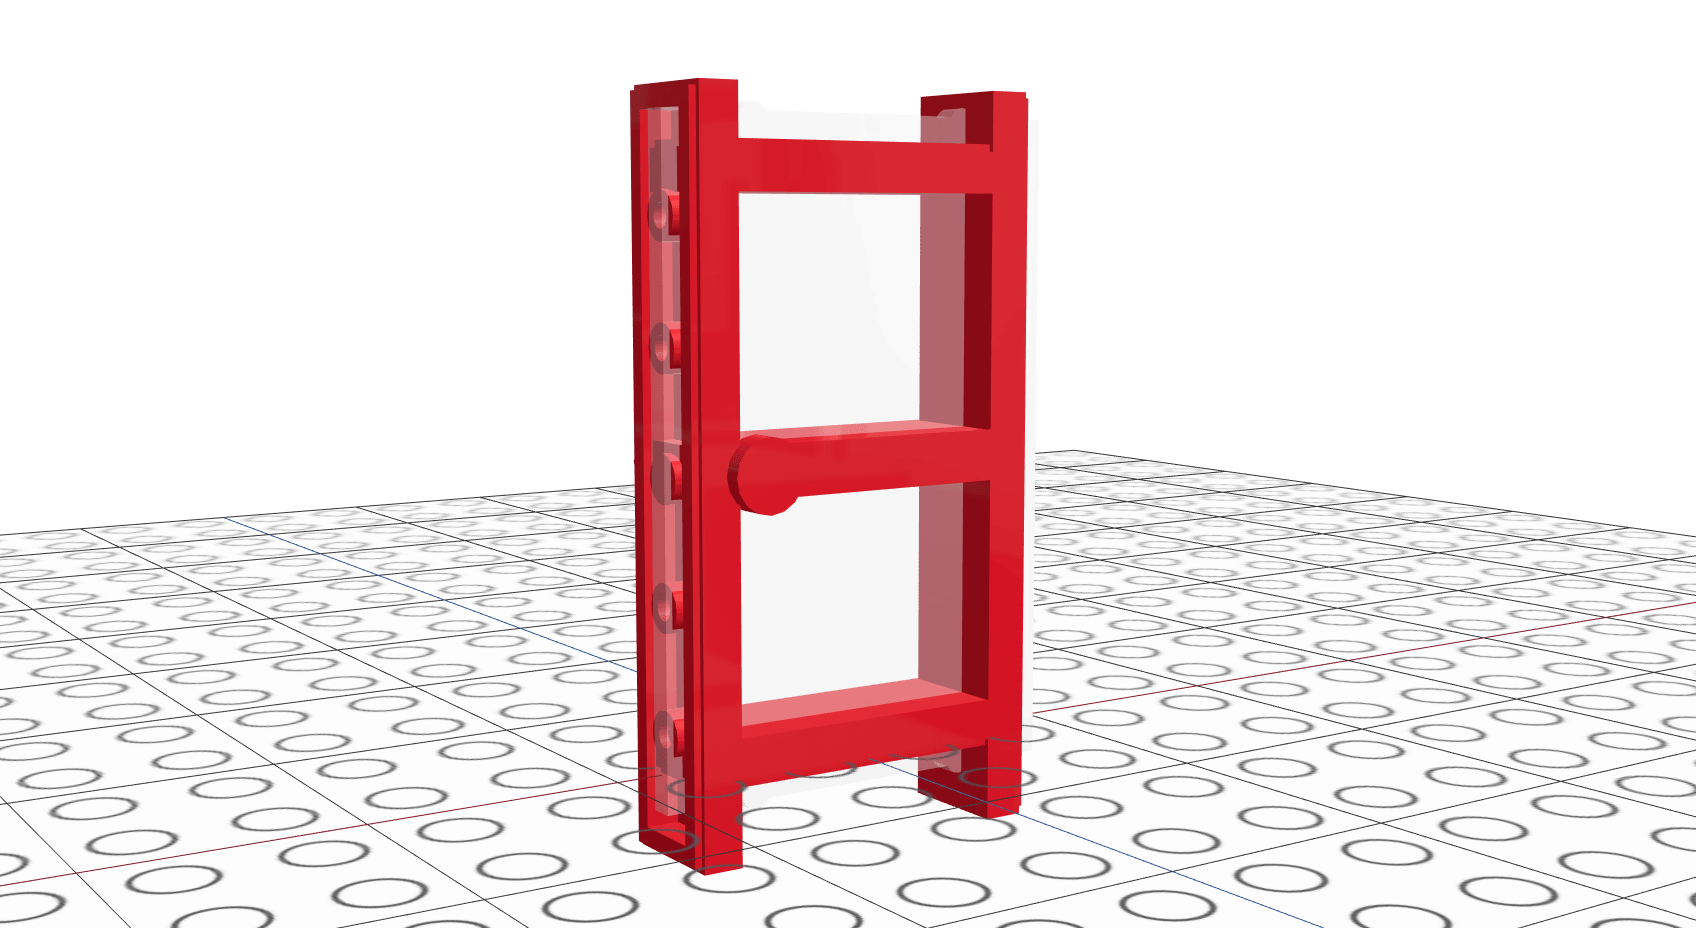
 Tracing stickers using Boxy SVG
Above is how I used Boxy SVG to trace the life preserver. Although a simple example, the workflow applies no matter the complexity of the decoration. Before exporting, I hid the sticker image. Also, as the sticker is round I left the edges transparent when exporting as a PNG file.
As a side note, Mecabricks generally doesn’t allow stickers. Most of the images I upload have been decorations printed on pieces. In some cases, you can cheat and treat them as such if they will layer on a brick. Yet, the stickers here don’t fit to pieces. As such, this workflow will be slightly different.
Cheating a bit.
As I noted earlier, I didn’t need all the stickers. Mecabricks had pieces with the decorations on them already. To make things easier, I exported a few models with the images I needed and then overlaid them into the sticker sizes I needed. It is a bit of a hack as using an SVG would be better. But, it reduced the time needed. Plus, it ensures consistency with the rest of the decorations.
As a note, this is also a good way to insert your own decorations. Chose a brick that is close enough when modeling. Then after exporting, you can replace the image in the directory. Or, once imported into Blender you can use nodes to replace the image with the decoration you want to use.
Although, I’ve used that trick many of times in my own models, I can’t do that here. Stickers don’t overlay bricks, so you have to do something else. We’ll walk through that, right after this slight detour.
Creating a new door.
In the last few renders of this model, I substituted a solid door that doesn’t resemble the original at all. Seeing some other examples, I threw together this reproduction using other parts in Mecabricks. Because it is constructed from other parts, it won’t work in all situations.
 Screenshot of LEGO 1x4 door recreated in Mecabricks
Yes, it isn’t 100% accurate, but it is a better representation of what the model looked like in 1977. I might tweak it some more, but really I need to break down and model the part in Blender. If I can do it in POV-Ray, I’m sure I can figure it out again. Plus, I have the original part for reference.
After replacing the doors with my reproductions, I spent a few minute tweaking a few other things. The ladder, for example, was backwards. With that done, I exported the model for the rendering.
Putting it together in Blender.
Okay, now comes the fun parts. Note that I’m using the Advanced version of the Mecabricks add-on. Yet, everything should work using the Lite one. As of this writing, you can’t add custom decorations within the Mecabricks renderer itself.
Load up your model and scene as you normally would. If you are stuck here, head over to the Mecabricks forum for help.
Once you have your model looking good, I usually drop the cursor where I want the sticker to go. Then, to add my stickers, I use a Blender add-in to import "Images as Planes.” You can turn it on in user settings.
First thing you’ll notice is that it is too small. Adjust the size it using the scale options. For more control, I enter them instead of using the shortcuts. Since models should be in millimeters, you can measure your stickers to get the right scale. Or, as I sometimes do, eyeball it based on brick sizes.
Now, the tricky part is rotating it. I found it best to select a nearby part and apply similar rotations to my sticker. Once it is aligned, you can then adjust the stickers position to be just over the bricks. Make sure it isn’t too high or a shadow or gap will result.
Now, one last thing before you are done. I tie in the Mecabricks’ materials. Open up a node tab, copy the mb_solid node. Now, paste that into your sticker’s node and connect it up between the image and output nodes. Because the life preserver was round, I had to also hook in a transparent node. Here’s how it looks in Blender.
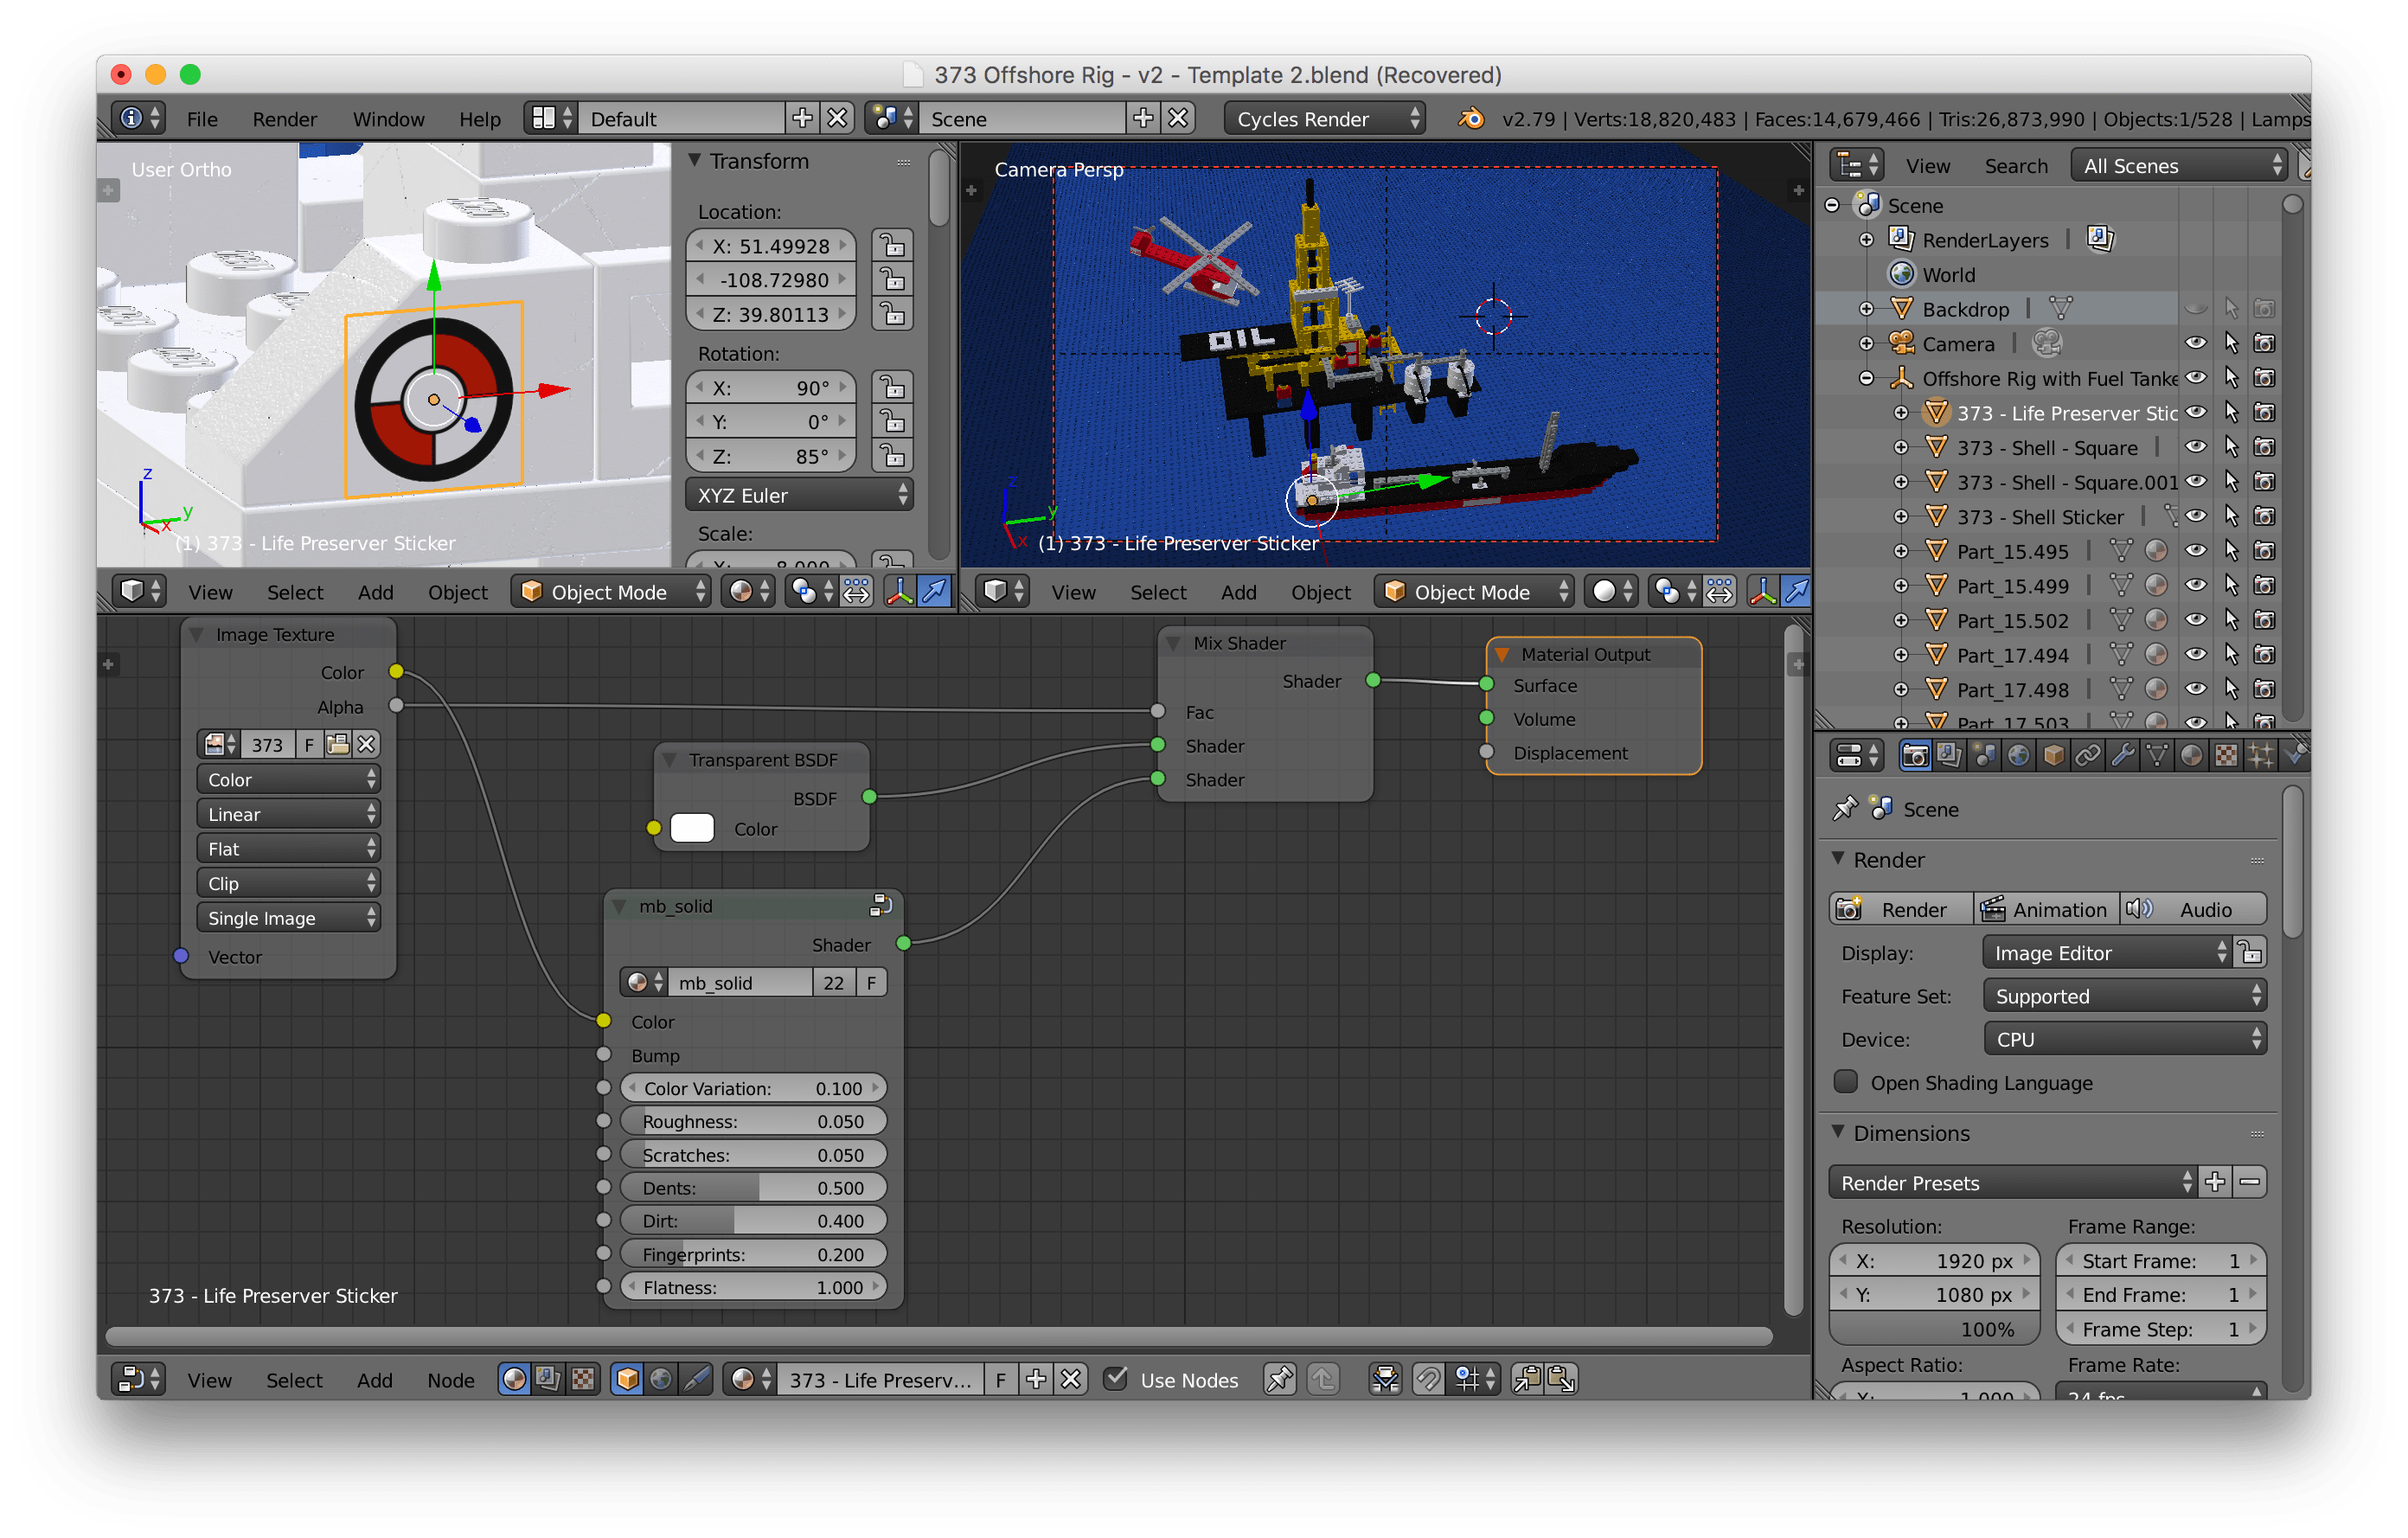 Screenshot of adding a sticker to LEGO set 373 in Blender
You can leave out the Mix Shader and Transparent BSDF if your sticker is solid. Although you can render the image without it, this ensure the textures match. Now, you can render the model and make sure everything looks right.
Closing comments.
Hope you enjoyed this little walk through. It took longer to explain then the actual work involved. But, having a few screen shots helps explain things. Plus, I now have a reference should I need to remember what I did in the future.
All I have to do is work on building the parts that are missing. There are about twelve pieces that don’t match or are inaccurate to the original. Some aren’t visible—like the wheels under the boat. But that door is still bugging me. I was able to model the old style minifigs. Time to get started on the rest.